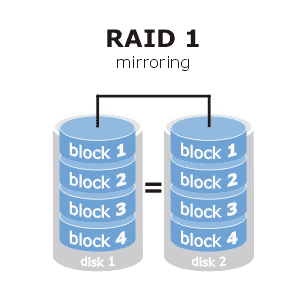
Vamos a partir de la base de que además del disco que engloba el sistema, tenemos dos discos más disponibles para trabajar:
# fdisk -l | egrep -e "hdb|hdd"
Disk /dev/hdb doesn't contain a valid partition table
Disk /dev/hdd doesn't contain a valid partition table
Disk /dev/hdb: 1073 MB, 1073741824 bytes
Disk /dev/hdd: 1073 MB, 1073741824 bytes
Creación del RAID 1
Lo primero que tenemos que hacer es configurar dos particiones, una en cada disco y del tipo RAID AUTODETECT (fd). Aquellos que tengáis dudas con este paso, revisad este artículo: crear y eliminar particiones con fdisk en Linux
Haríamos este paso en ambos discos:
# fdisk /dev/hdd
Device contains neither a valid DOS partition table, nor Sun, SGI or OSF disklabel
Building a new DOS disklabel. Changes will remain in memory only,
until you decide to write them. After that, of course, the previous
content won't be recoverable.

The number of cylinders for this disk is set to 2080.
There is nothing wrong with that, but this is larger than 1024,
and could in certain setups cause problems with:
1) software that runs at boot time (e.g., old versions of LILO)
2) booting and partitioning software from other OSs
   (e.g., DOS FDISK, OS/2 FDISK)
Warning: invalid flag 0x0000 of partition table 4 will be corrected by w(rite)

Command (m for help): n
Command action
   e   extended
   p   primary partition (1-4)
p
Partition number (1-4): 1
First cylinder (1-2080, default 1):
Using default value 1
Last cylinder or +size or +sizeM or +sizeK (1-2080, default 2080):
Using default value 2080

Command (m for help): t Selected partition 1
Hex code (type L to list codes): fd
Changed system type of partition 1 to fd (Linux raid autodetect)

Command (m for help): w
The partition table has been altered!

Calling ioctl() to re-read partition table.
Syncing disks.
# partprobe
El resultado hasta el momento sería esto (omitiendo el disco de sistema):
# fdisk -l

Disk /dev/hdb: 1073 MB, 1073741824 bytes
16 heads, 63 sectors/track, 2080 cylinders
Units = cylinders of 1008 * 512 = 516096 bytes

   Device Boot      Start         End      Blocks   Id  System
/dev/hdb1               1        2080     1048288+  fd  Linux raid autodetect

Disk /dev/hdd: 1073 MB, 1073741824 bytes
16 heads, 63 sectors/track, 2080 cylinders
Units = cylinders of 1008 * 512 = 516096 bytes

   Device Boot      Start         End      Blocks   Id  System
/dev/hdd1               1        2080     1048288+  fd  Linux raid autodetect
Ahora ya podemos hacer uso del comando mdadm para crear el RAID 1 entre las particiones configuradas en ambos discos. Especificamos con -v la opción verbose, -C significa la creación del raid seguido del nombre asignado al array /dev/md0 y le indicamos que los dos discos serán activos (-n 2), podríamos asignar discos spare con -x. Finalmente especificamos los dispositivos a configurar en el array (las dos particiones creadas antes) y especificamos que es un RAID 1 con -l 1:
# mdadm -v -C /dev/md0 -n 2 /dev/hdb1 /dev/hdd1 -l 1
mdadm: size set to 1048192K
mdadm: array /dev/md0 started.
Monitorizar y gestionar el RAID
Podemos ver el estado del RAID en cualquier comento con mdadm –detail seguido del RAID a revisar:
# mdadm --detail /dev/md0
/dev/md0:
        Version : 0.90
  Creation Time : Tue Sep 27 18:02:46 2011
     Raid Level : raid1
     Array Size : 1048192 (1023.80 MiB 1073.35 MB)
  Used Dev Size : 1048192 (1023.80 MiB 1073.35 MB)
   Raid Devices : 2
  Total Devices : 2
Preferred Minor : 0
    Persistence : Superblock is persistent

    Update Time : Tue Sep 27 18:03:33 2011
          State : clean
 Active Devices : 2
Working Devices : 2
 Failed Devices : 0
  Spare Devices : 0

           UUID : 9a7817d8:038050a4:82a2f37d:414f679e
         Events : 0.2

    Number   Major   Minor   RaidDevice State
       0       3       65        0      active sync   /dev/hdb1
       1      22       65        1      active sync   /dev/hdd1
En caso de que uno de los discos fallase, habría que sacar del raid el disco fallido y reemplazarlo por otro, con el cual habría que seguir todos los pasos anteriores para prepararlo.
Forzamos el disco como fallido para hacer la prueba:
# mdadm /dev/md0 -f /dev/hdd1
mdadm: set /dev/hdd1 faulty in /dev/md0
Si ahora hicieramos un mdadm -D /dev/md0 veríamos el fallo del disco y el estado degraded:
# mdadm --detail /dev/md0
/dev/md0:
        Version : 0.90
  Creation Time : Tue Sep 27 18:02:46 2011
     Raid Level : raid1
...
...
...
          State : clean, degraded
 Number   Major   Minor   RaidDevice State
       0       3       65        0      active sync   /dev/hdb1
       1       0        0        1      removed

       2      22       65        -      faulty spare   /dev/hdd1
Sacamos el disco fallido del raid:
# mdadm /dev/md0 -r /dev/hdd1
mdadm: hot removed /dev/hdd1
Ahora el estado seguiría siendo degraded pero sin el disco fallido, así que sólo quedaría añadir un nuevo disco para que el RAID se reconstruyera:
# mdadm /dev/md0 -a /dev/hdd1
mdadm: re-added /dev/hdd1
Y automáticamente debería activarse el rebuild/recover y sincronizar la información entre ambos discos:
# mdadm -D /dev/md0
/dev/md0:
        Version : 0.90
  Creation Time : Tue Sep 27 18:02:46 2011
     Raid Level : raid1
     Array Size : 1048192 (1023.80 MiB 1073.35 MB)
  Used Dev Size : 1048192 (1023.80 MiB 1073.35 MB)
   Raid Devices : 2
  Total Devices : 2
Preferred Minor : 0
    Persistence : Superblock is persistent

    Update Time : Tue Sep 27 18:12:32 2011
          State : clean, degraded, recovering
 Active Devices : 1
Working Devices : 2
 Failed Devices : 0
  Spare Devices : 1

 Rebuild Status : 44% complete

           UUID : 9a7817d8:038050a4:82a2f37d:414f679e
         Events : 0.6

    Number   Major   Minor   RaidDevice State
       0       3       65        0      active sync   /dev/hdb1
       1      22       65        1      spare rebuilding   /dev/hdd1
Eliminar un RAID
Para eliminar un RAID antes hay que pararlo, y posteriormente destruirlo:
# mdadm -vS /dev/md0
mdadm: stopped /dev/md0
# mdadm -vr /dev/md0
A partir de aquí, pues únicamente quedaría dar formato a /dev/md0 con el sistema de ficheros que necesitéis y gestionarlo como un sistema de ficheros normal.
Esquema raid: dis.um.es